May 28, 2026
Embedded Journey - part 1ATmega Adventures 1: Let's get close to the metal!
In this post, I'll start my embedded journey by building the "Hello, World!" of the embedded world: Blinky.
For years, most of my programming has lived in a browser or on a server, using frameworks like React and working with languages like Go and C#. Recently my interest got piqued by an Arduino we had lying around at work, and I started wondering what happens on the lower levels of programming. What does it actually take to get something running on there and how does any of it actually work?
This series is my attempt to find out. I’m starting from the very basics and will be documenting what I learn along the way. The goal isn’t to become an expert overnight, but to gradually build a solid understanding of how things work closer to the metal. And what better place to start than the embedded equivalent of “Hello, World!”: Blinky.
And so it begins…
Time to get started! First up, I like to use some pseudocode to mentally map out what I need to do. So I already did a bit of research and tried to read the datasheet before starting this. Let me tell you, reading a datasheet takes some getting used to. I think I found out what registers to use.
int main() {
  // Configure clock

  // Set DDRD - DDD5 as output

  // Toggle PORTD5 every second
  return 0;
}
Okay so this is what I started off with. Now I wanted to flash it to my Arduino… But how? I’m pretty new to C and compiling stuff. So I had to do some research and learnt that I needed a few commands to compile my source code and eventually convert it to hexadecimal, which ultimately will be flashed onto the Arduino.
So this took about three commands (there’s probably a faster way). I also had to figure out how access the Arduino in WSL. (This is the /dev/ttyACM0 you see in the avrdude command).
avr-gcc -mmcu=atmega328p -Os -o main.elf main.c
avr-objcopy -O ihex -R .eeprom main.elf main.hex
avrdude -p m328p -c arduino -P /dev/ttyACM0 -b 115200 -U flash:w:main.hex:i
When I ran these commands I didn’t get any errors. So that probably means it worked. Now, I knew about Makefiles, but not the specifics. I knew enough that they were used to make things easier, so I did some research on these and managed to get the above commands in a Makefile, allowing me to run the steps all in one simple command: make flash. Hurray! Next up is trying to see if it actually works.
In the next rendition of my code I wanted to test if I can actually get the LED to turn on with my code. I do this in raw C using bit-masks (this took some time to understand), essentially it allows us to manipulate certain bits in the register without affecting the other bits. 00101100 1100101 0111001… Oh sorry, I started talking in bytes.
Many of the registers we’ll be working with are 8-bit, or one byte. And you can control each individual pin. So the code below sets pin D5 as an output pin (DDD5 could be replaced by just 5, meaning shift over to the left 5 times and set 1. But using DDD5 (as defined in <avr/io.h>) is more explicit. After that we switch the fifth bit on in PORTD, essentially telling it to output something.
#include <avr/io.h>
int main() {
  // Configure clock

  // Set DDRD - DDD5 as output -> On Arduino DDRD is the data direction register. We tell it to set pin 5 as output.
  DDRD |= (1 << DDD5);

  // Toggle PORTD5 every second

  // Or maybe try and turn it on for starters
  PORTD |= (1 << PORTD5);
  return 0;
}
I could have written this in the Arduino framework using pinMode() and digitalWrite(), but part of the goal of this series is to understand what’s happening underneath those abstractions. That means spending some time with datasheets, registers, and bit manipulation.
Lo and behold, it works! It doesn’t blink yet, but at least I’m positive I can get my code onto the Arduino and make it do… Something.
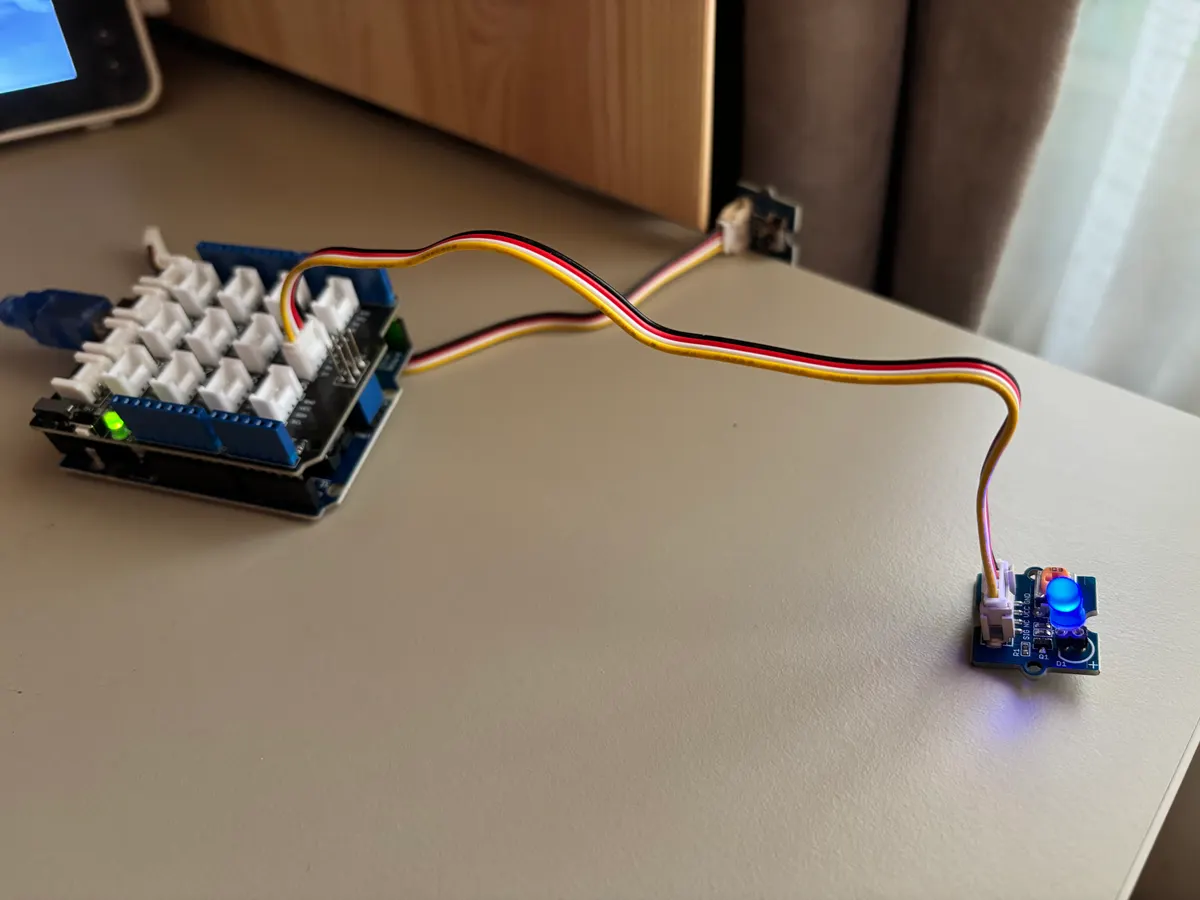 Seeing a single LED turn on has never felt so rewarding.
Getting the LED on was only half the challenge. To make it blink, I needed to find a way to measure time without depending on Arduino’s built-in functionality. I could simply toggle the LED in a loop, but the CPU runs at 16 million cycles, meaning the toggling on/off would happen, but it would happen so fast that our underdeveloped reptilian eyes wouldn’t be able to see it. (I mean, come on evolution… You can do better!)
I had to dive into the registers, and learn about prescalers and clock speeds. I’ve never dealt with any of this during my time as a web dev. This is such a big puzzle, but I AM LOVING THIS. Hold on to your horses. Here’s the code for a working example of blinky in raw C. Is it perfect? I’m almost 100% sure it’s not. But it works, and I made it work.
#include <avr/io.h>
int main() {
  // Configure clock
  TCCR1B |= (1 << CS12) |
            (1 << CS10); // This sets the clocks prescaler to 1024. We divide
                         // our chip's processing speed (16mhz) by 1024 to make
                         // time more manageable. So 16,000,000 / 1024 = 15,625
                         // timer ticks per second

  TCNT1 = 0; // This holds our ticks. Make sure it starts at 0.
  const int SECOND = 15625;

  // Set DDRD - DDD5 as output -> On Arduino DDRD is the data direction register. We tell it to set pin 5 as output.
  DDRD |= (1 << DDD5);

  while (1) {
    // Toggle PORTD5 every half second
    if (TCNT1 >= SECOND / 2) {
      PORTD ^= (1 << PORTD5);
      TCNT1 = 0;
    }
  }

  return 0;
}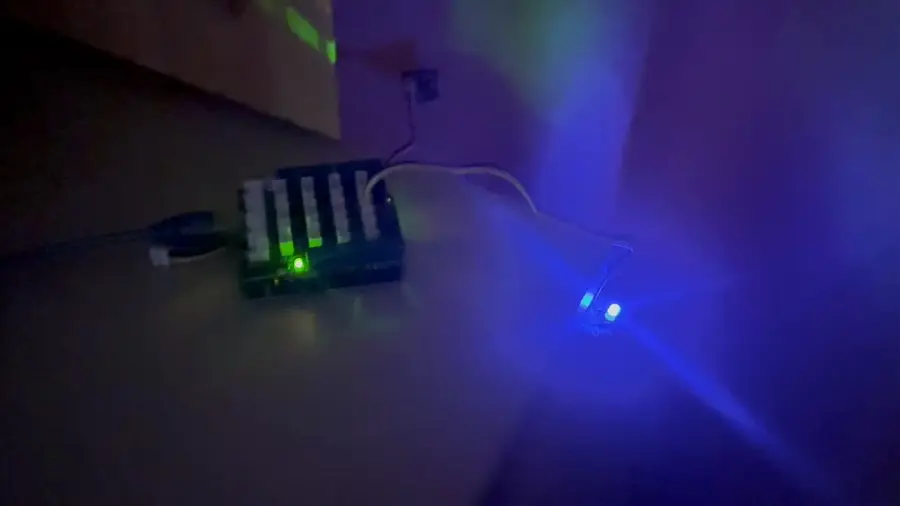
So there you have it. Blinky written in raw AVR C. It sure was a lot to learn. What surprised me most is that getting the LED to turn on wasn’t actually the hard part. Most of my time was spent figuring out the toolchain, learning how AVR compilation works, and understanding how to get my board accessible from WSL.
Funny thing is, I always tell my students not to learn too many things at once. And here I am trying to learn embedded systems, improving my C, figuring out toolchains and making sense of datasheets all at the same time. Practice what you preach much?
I really hope you enjoyed reading, and make sure to stick around for part 2 of this series where I will be diving even deeper!